REPLACING A LEAF SPRING
Whether a leaf spring has broken or simply become weak over time, there's usually no other solution than replacing it. In this guide, we explain how the replacement process works. This step-by-step guide can be helpful for anyone considering doing it themselves, or simply wanting to understand what's involved. In this article we only refer to vans, motorhomes and pickups since heavy duty trucks represent another league and need special tools and knowledge.
How big an effort is it and how long does it take to replace a leaf spring?
The time required to replace a leaf spring can vary greatly depending on several factors. In an ideal scenario—where the mechanic has experience, the right tools, and no unexpected issues arise—a single leaf spring can typically be replaced within 1 hour.
However, complications are common. Rust and corrosion on spring bolts, shackles, or U-bolts can significantly increase the time and effort needed. In such cases, the job may take several hours and require additional tools, skills, and patience. Below, we explain the most common challenges and how to deal with them effectively.
What is the cost to replace a leaf spring in a service?
The cost of replacing a leaf spring at a service shop can vary widely depending on several factors. The cheapest option—usually a small, independent mechanic—might start around 100 EUR. However, if the job is time-consuming or performed at an authorized service, the total cost can easily exceed 500 EUR. These prices do not include the cost of the new leaf spring itself and other materials or parts.
Pricing depends on the vehicle type, local labor rates, and potential complications such as rusted bolts or seized shackles, which can significantly extend the working time. In the sections below, we explore what influences the cost and what you should consider when choosing a workshop.
Steps of leaf spring replacement
If you've decided to replace the leaf spring yourself, follow these step-by-step instructions. We also list potential complications that hobby mechanics may encounter, along with possible solutions.
Safety preparation
Warning
Before lifting the vehicle, apply the parking brake and engage a gear. Wedge the front wheels to make sure the vehicle cannot move forward or backward under any circumstances.
Lift the vehicle at the manufacturer-specified lifting point. Raise it to a height where there is a 1–2 cm gap between the tire and the ground.
Next, decide whether the leaf spring will be replaced under the vehicle (e.g., using a two-post lift or a service pit). If this isn't possible, you'll need to remove the wheel first.
Important
For safety, always place jack stands under the vehicle before starting the work. Never rely solely on a jack—whether hydraulic or mechanical—because if it fails while you're working underneath, serious injury may occur. Position the jack stand at a suitable point that can support the full weight of the vehicle in case the jack malfunctions.
Preparing the bolts
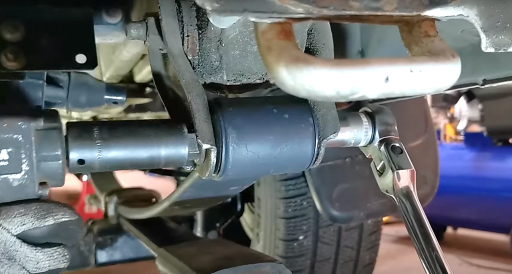
Clean all threaded bolts, including U-bolts, spring eye bolts, and the stabilizer link bolt. Remove any dirt or mud. Apply penetrating oil or thread cleaning spray to the threads.
After a few minutes, you can begin loosening the nuts. These include:
-
U-bolt nuts
-
Lower shock absorber nut
-
Leaf spring eye bolts (both ends)
-
Lower stabilizer link nut
It's wise to first check that all nuts can be loosened before fully disassembling anything. If you encounter a stuck bolt or nut, you still have the option to stop the job and take the vehicle to a workshop with better tools and experience to handle the issue.
Critical safety warning about axle drop
Important
During the next steps, the vehicle's rear axle (axle housing) will drop significantly. If the wheel has been removed, it may fall all the way to the ground on that side. Be mindful of brake lines and electrical cables, which can be stretched or torn by the axle's weight. Damaging a brake line will render the vehicle undrivable.
Removing the U-bolts
Remove the U-bolts. Unscrew the four nuts and remove the U-bolts.
Possible problem:
One of the nuts cannot be unscrewed due to corrosion or damage, or you cannot apply enough torque to loosen it.
Possible solutions:
-
Heat the nut (e.g., with an induction heater) to expand it, making removal easier
-
Cut the U-bolt (e.g., with an angle grinder) and replace it with a new one
Disconnecting suspension components
Unscrew the lower shock absorber bolt.
Unscrew the lower stabilizer link bolt.
Loosen and remove the nuts on the spring eye bolts, then remove the bolts themselves.
Possible problem:
The spring eye bolt is stuck.
Possible solution:
Stuck bolts are often due to residual tension in the leaf spring. Raise or lower the axle to unload the spring fully. Once it's free of tension, the bolts can usually be removed or knocked out using a tool or screwdriver.
Removing the old spring
Remove the old leaf spring from the vehicle.
Reinstalling the new leaf spring
The steps for reinstallation are essentially the same, just in reverse order. Take note of the following:
Installation checklist
-
Before placing the spring onto the axle, clean the axle seat and ensure the center hole is free of dirt. The center pin on the spring must fit properly into this hole
-
If the leaf spring is asymmetrical, make sure the correct end faces forward. Installing it backwards will result in misalignment of the rear axle, causing the vehicle to pull to one side
-
Tighten the four U-bolt nuts gradually and evenly, in multiple steps
-
After confirming that all bolts are properly tightened, lower the vehicle
-
After driving 500–2000 km, recheck the torque of the U-bolt nuts
About U-bolt torque
U-bolts are responsible for securely attaching the leaf springs to the axle, making them a crucial component. The nuts on the U-bolts must be tightened to a specific torque. Always refer to your vehicle's specifications for the correct torque. If the factory torque specification is not available, use our recommended torque for the 10.9 steel U-bolts:
-
M8: 35 Nm
-
M10: 75 Nm
-
M12: 130 Nm
-
M14: 200 Nm
-
M16: 315 Nm
-
M18: 440 Nm
-
M20: 610 Nm
-
M22: 830 Nm
These values apply to U-bolt thread surfaces that are free of oil or grease. If the surface is lubricated, reduce torque by 10% to 15%.
Key takeaways
-
Leaf spring replacement typically takes 1 hour in ideal conditions
-
Rust and corrosion can extend the job to several hours
-
Service costs range from 100 EUR to over 500 EUR (excluding parts)
-
Always use jack stands—never rely solely on a jack for safety
-
Apply penetrating oil to all bolts before attempting removal
-
Check that all nuts can be loosened before full disassembly
-
Be aware that the rear axle will drop significantly during removal
-
Protect brake lines and electrical cables from damage
-
Stuck U-bolts can be heated or cut and replaced
-
Clean the axle seat before installing the new spring
-
Asymmetrical springs must be installed in the correct direction
-
Tighten U-bolt nuts gradually and evenly in multiple steps
-
Recheck U-bolt torque after 500–2000 km of driving
-
Use proper torque specifications for U-bolts (35–830 Nm depending on size)
-
Reduce torque by 10-15% if threads are lubricated
Related topics
Continue learning - explore these related topics: